Can I just say WHA HOO!! I love, love, love creating new designs and I especially love breaking open a new canvas and just let the creative juices flow through my finger tips. Its an addiction - a passion...love. it. :)
So, I showed this piece in a previous post - when I was talking about my thumbprint on the creative world.
Now I want to show you how to CREATE this piece. This is more of a tutorial on how you can dig deep and find your creative, artistic passion!
OK!! So, lets start with a beautiful, crisp WHITE canvas :) I LOVE to use 12x12 sized canvas with 1" deep sides. But, you can use whatever size you want :)
Next (and this is one of my favorite steps!) pick your background color. I generally like to pick three colors and just spread them on the canvas with a foam brush
Ok! Let 'er dry! You can either let it air dry (start a new canvas for another project or go take care of other projects you have going on) OR you can use a heat gun or hair dryer to speed up the process. If you are like me (patience is NOT a strong point :) ) you will use the heat gun to speed it up...
Next step is to pick out some stencils. I. LOVE. STENCILS. I have a rather large pile of them sitting on my table in my studio :) For this project I have chosen four to layer on the canvas.
In regards to color - try to use colors that pop against your background color. (You will understand why later on in this tutoral :) ) You want to create interest in your piece and this is a great way to do so. Let your heart flow into this - choose colors that would almost scare you to put together - you will be surprised and how well it all turns out.
VERY IMPORANT STEP: You need to let each layer dry prior to applying the next layer. Otherwise you will have a big gloppy (but colorful!) mess :)
First layer of stencil: Turquoise (then let it dry or dry it yourself)
Next layer: Hunter green (let it dry or dry it)
Next layer: deep, dark red (again, needs to dry...see my cute pink heat gun in the corner here? LOL)
Next layer: Light pink (looks white, but its really light pink.. - let 'er dry!)
Finally, after all of that hard work of layering, you are going to put a nice 'wash' over the stencils. The reason for this is to 'tone' down, or age, your background so the foreground will really pop and the two are 'fighting' with each other.
Have a paper towel or rag handy for this step, can be kind of tricky:
Take your brush, fill it with your background color and then dip it in water (you are creating a wash here - Yay!).
Now, brush it on the canvas. After you have brushed it on, start wiping and dabbing your towel on the wash. Don't completely wipe it off - you want to tone down your background but you don't want to completely wipe your wash away :)
Voila! Your background is now 'aged' and toned down :)
Your next layer is STAMPING! LOVE stamping!! Pick whatever stamps you want for your background. I like to use Ranger archival black ink - it really brings out the stamping but not too much so that it dominates everything :)
Go ahead and stamp away on your canvas - create texture and interest as you go~
Ready for another layer? That's what mixed media is all about - layering and more layering. Love it!
So..have to admit...I am a rub-on junkie...I have a slew of them in my studio. My most favorite are white rub-ons. They just really, really highlight your piece and gives it another dimension.
I like to add the white rub-ons around the perimeter of my paintings - to give it more of a 'frame'.
I am SO, SO excited about this next product - Faber-Castell has a super AWESOME WHITE paint pen. I have been looking and looking for something like this for quite a while. This pen is amazing! It is so opaque and the paint goes on smooth. Love them - if you can find them, get two or three as they sell out quickly. You will fall in love too!
Yet another staple in my collection are the Faber-Castell artist pens big brush. Again, AMAZING products. I love how they stay wet JUST long enough for me to 'smear' my finger through to add shading.
Paint...
Smear! (Repeat! Get your hands dirty!)
Background - done! Lets move on to the foreground!
I love using scraps of paper to build the subject of my work...this just happens to be a bird house and branch
Paint the pieces whatever color you are feeling...
(Um, yeah, that is my table underneath the paper...LOL - fun, huh?)
Seriously, who doesn't love Mod Podge? I should own stock... :)
Mod Podge your pieces onto the canvas. Please note: I only Podge the BACK of my pieces and not the front - this will allow you to modify the house easily with paints and pens.
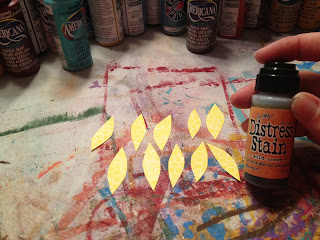
Sunflower petals ready for antiquing :) I cut the petals out of scrap paper and applied the stain directly on the petals and then wiped the excess away
:) Podge the sunflower on! Doesn't have to be perfect :)
Musical note paper...those are the leaves for the branch...
Lightly paint the leaves in a deep green.
Ok, we need to add some dimension to the leaves - remember the super fantastic Faber-Castell paint pens?
Shade in the outline and inner 'vein' of the leaves with that pen - remember: Paint, SMEAR - repeat :)
Yet another great product that is so easy to work with - Faber-Castell gel sticks. Again, super easy to use -
Apply...
Smear- repeat! (the gel sticks come in many colors so use as many as you want to make your leaves come alive!)
I wanted my leaves to have a 'stitch' look to them so I grabbed my Faber-Castell white paint pen and painted in my stiches.
Black ink pen to outline the house...
More details! I may add more details than the average bear but its what I love and it really makes my work come alive. Hopefully you will find this too!
And outline the sunflower plus add shading to the petals...
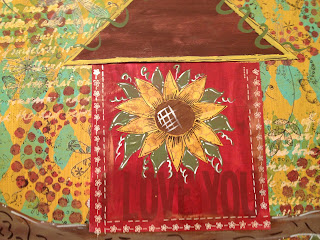
Here is the finished sunflower after adding in more detailing, painted in some leaves and vines plus I added some rub-on framing to the house.
Now, add your vine with sunflowers and roses to the roof of the house! Be adventurous with this - if you don't like the flowers here, add your own twist and spin :)
Bluebird time! Can you tell I just adore Faber-Castell products :)
I start each bird with turquoise paint. Paint a large circle on the bottom for the body and a smaller circle on top for the head. Add a couple of 'bumps' on each side of the body and there you have it! Easy peasy!!
Add eyes and beak with your black ink pen...
Shading time :) Outline the birds with your blue Faber-Castell pen, let dry. Then take your gel stick and shade in each bird - remember, you only need a little bit of the gel and then rub it around until you get the look you want.
Outline in black ink and white paint pen. Add your own personal touches to the birds too! (yellow beak, tufts of hair on top :) )
Adding detail to the flowers - shading, painting, black pen, white pen - are you seeing a trend in my detailing here? :)
The smallest details make the biggest difference don't they?
Voila!!! ALMOST finished product LOL!
Your final step is using GESSO to add the white to each sides of the house (look for this in the paint/canvas section of your favorite hobby store). Apply ONE coat of gesso to each side of the house. Once the gesso is dry you will notice it is almost like flat house paint :) Meaning, its very easy to write on. Take your black ink pen and write your quote on the gesso. Let dry.
Congratulations :) You are done :)
I highly encourage you to develop your own 'style' of this piece. While its okay to try and make an exact replica, you need to find your own 'thumbprint' - what makes your style unique? What makes it you? When YOU look at it do you think, 'Yeah, that's totally me!'
Give it shot - We ALL have an inner artist - we just have to dig deep to find it and get EXCITED about creating!


No comments:
Post a Comment